Service Pre-booking
If your church is keeping social distance in your services, this new feature is a must have!
With Service pre-booking, your church attendees can RSVP before a service to save a seat. That way you won’t excede your seating capacity.
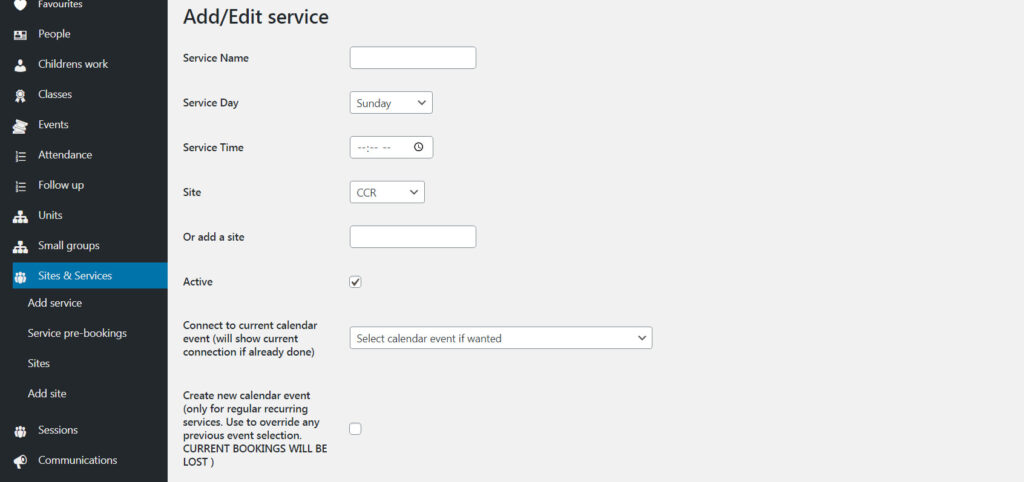
The first thing you need to do is set up a service. (For more information on how to set up a service; see Sites and Services.) Go to Sites & Services and click on Add a service. In the Add a service form, make sure to check the box for Create new calendar event. This is crucial for service pre-booking to work. It will not work without first checking that box.
As of this moment, you cannot add service pre-booking to an existing service.
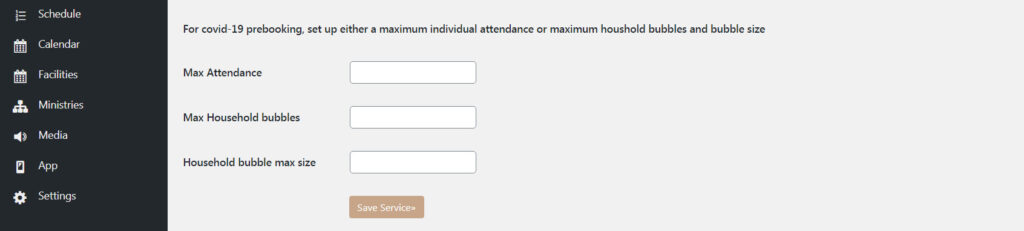
After you have filled out the form and selected “Create new calendar event”, you can specify the pre-booking details.
There are two ways here to allow the pre-booking of seats.
If you simply add a max attendance, people can book seats individually, until all the seats are taken up.
If you use benches, or are planning to seat members by family, household bubble seating was designed for you. Set the number of Max household bubbles.
Then write a number in the text field for Household bubble max size; this refers to how many people can sit in one household bubble. This is so that if the household bubble (or bench or what have you) can seat four, a family of five know to reserve two household bubbles. A family of two could still reserve a household bubble that can hold up to four people; thus, household bubble “max” size.
When you’re ready, hit Save Service.
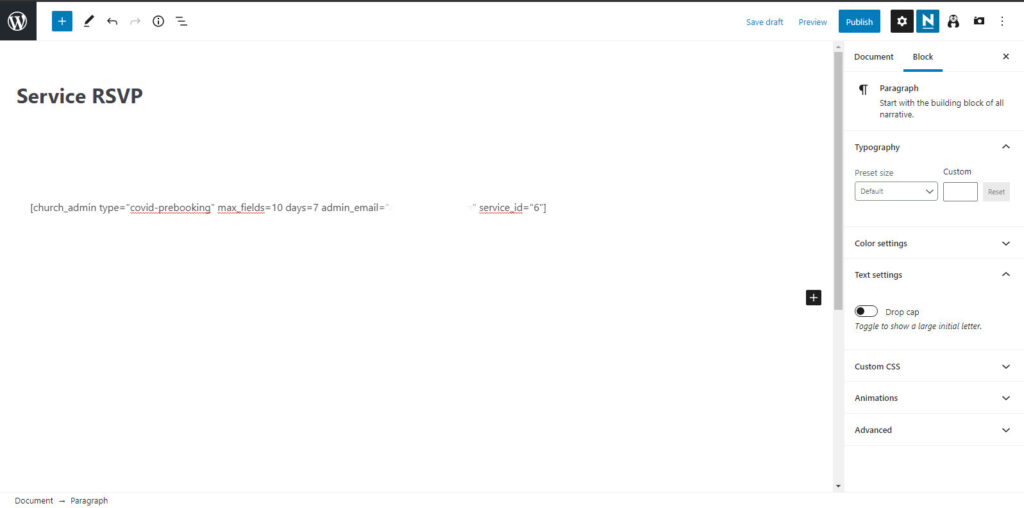
Step two is to create a page on your website (name it what you will; we called ours Service RSVP) that people can go to for seat reservation.
On the Sites & Services page in the Church Admin menu, you can find a shortcode for the service you’ve just created for pre-booking. (For more on shortcodes; see Shortcodes.)

Under the column title “Max attendance” are the shortcodes for service pre-booking. Find the service you want to use service pre-booking for. Copy the shortcode under By individuals if you are going to use service pre-booking for individual seats. Copy the shortcode under By households/support bubbles if you are going to use service pre-booking by household bubbles.
Next, go to the page you created for service pre-booking and paste the shortcode. Feel free to also add whatever information or design to that page that you would like. For the sake of demonstration, I have left the page blank apart from the shortcode.
Note: you can add more than one shortcode to the same page.
Hit Publish and your ready to go! That’s all you have to do. Of course, you can design your page to look much more beautiful, but this is the bare bones version of what it will look like.

There is, however, one last option you should be aware of. How many fields for adding names are available is customizable by editing the shortcode. This is how our service shortcode looks, which should be almost identical to how yours looks. (With the email erased of course.)

Where it says max_fields=10 you can change the ten to any lesser number, which will change the number of name fields in one form. You can allow from 1-10 names to be submitted in one seat reservation request. The text fields in the form generated will be adjusted accordingly.